
Basement Waterproofing Methods: Interior, Exterior, and Everything Between
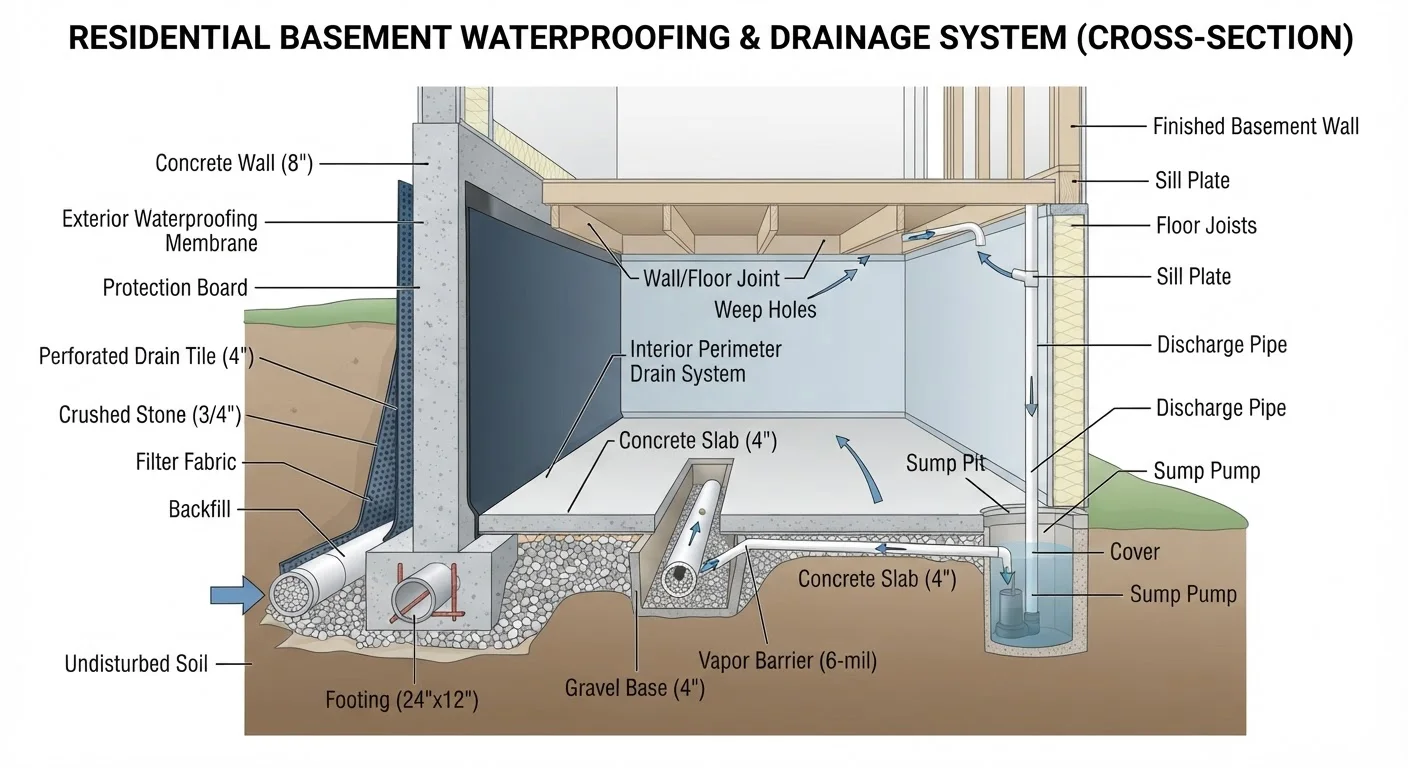
Photo credit: ArticlesHaven.net
In this article
Not all basement moisture problems have the same solution. Learn how interior and exterior waterproofing approaches differ in scope and application.
Key Takeaways
- Interior waterproofing manages water after it enters; exterior waterproofing prevents entry at the source.
- Exterior excavation methods are more disruptive and costly but address the root cause of water intrusion.
- Interior drainage systems and sump pumps are a reliable fallback when exterior work isn't feasible.
- Crack injection and surface sealants are DIY-approachable for minor issues but won't solve hydrostatic pressure problems.
- Permits and professional assessment are often necessary before committing to a full waterproofing system.
Why One Method Doesn't Fit All Basements
Basement moisture problems vary widely - from harmless condensation on a cold pipe to active water pushing through foundation walls under hydrostatic pressure. Before choosing any waterproofing approach, the first step is diagnosing the actual source. Applying an interior sealant to a wall that's experiencing exterior soil saturation, for instance, won't solve the underlying problem.
It helps to understand that waterproofing falls into three broad categories: exterior (keeps water away from the foundation), interior (manages water that has already entered), and supplemental systems (drainage, grading, and humidity control). See our guide to moisture entry points for help tracing where your problem actually starts.
Diagnose Before You Treat
Tape a piece of plastic sheeting to a damp basement wall and seal the edges completely. Wait 24-48 hours. If moisture collects on the room-facing side, the problem is condensation, not seepage. If moisture appears between the plastic and the wall, water is coming through from outside. This simple test helps clarify which approach makes sense before spending money.
Exterior Waterproofing: Stopping Water at the Source
Exterior waterproofing is the most comprehensive approach. It typically involves excavating soil around the entire perimeter of the foundation down to the footing, applying a waterproof membrane or coating directly to the exterior wall surface, and installing a drainage board and perimeter drain to direct groundwater away.
The advantage is clear: water never reaches the wall. The tradeoff is cost and disruption. Excavating around a full foundation requires heavy equipment, removal of landscaping, and potentially weeks of work. It's rarely a DIY project. Costs vary significantly by region, foundation depth, and soil conditions - always get multiple professional estimates.
Well-designed exterior grading and landscaping also play a role here. Poor slope around a foundation can direct runoff toward the wall regardless of any membrane installed. Our drainage-conscious landscaping guide covers how to address that layer of the problem.
| Exterior Waterproofing | Interior Drain Tile | Crack Injection | Surface Sealants | |
|---|---|---|---|---|
| Primary function | Prevents water entry | Redirects water inside | Seals specific cracks | Reduces surface moisture |
| Addresses root cause | Yes | Partially | For isolated cracks | No |
| Disruption level | High - full excavation | Moderate - slab cutting | Low | Very low |
| DIY-friendly | No | Rarely | Yes, for minor cracks | Yes |
| Typical use case | Severe seepage, new builds | Persistent floor-level water | Hairline or isolated cracks | Condensation, surface damp |
| Permit likely required | Yes | Often | Usually not | No |
Interior Waterproofing: Managing Water That Gets In
Interior systems don't stop water at the wall - they intercept and redirect it before it can cause damage. The most common version is a sub-floor drain tile system (a perforated pipe channel installed along the interior perimeter of the basement floor) paired with a sump pump that evacuates collected water.
This approach is less invasive than exterior excavation and can be highly effective for persistent water accumulation, especially in areas where exterior work is impractical. It does require cutting into the concrete slab, and installation is typically handled by professionals given the structural and waterproofing precision required.
Interior wall panel systems - rigid plastic panels that channel seeping water down to the drain - are another option, often installed alongside drain tile. They don't stop seepage, but they manage it without demolishing finished walls.
Interior Systems Don't Solve Structural Problems
A drain tile system will manage water effectively, but it won't address bowing or cracking foundation walls caused by soil pressure. If you notice horizontal cracks, inward wall movement, or significant wall displacement, consult a structural engineer before any waterproofing work - these are separate issues requiring different interventions.
Crack Injection and Surface Sealants: The DIY Tier
For hairline cracks or isolated damp spots with no active water intrusion, crack injection is a viable and relatively affordable option. Polyurethane foam injection expands to fill a crack and remains flexible, making it useful for non-structural cracks that may move slightly with temperature. Epoxy injection is stronger and better suited for structural crack repair, though it requires dry conditions to cure properly.
Hydraulic cement is another common product used to plug active leaks at specific points - it sets quickly even with water present. These are legitimately DIY-approachable for isolated problems, though anyone working near foundation walls should be aware that seemingly minor cracks can sometimes indicate deeper structural issues worth a professional assessment.
Waterproofing paint and masonry sealants can reduce surface moisture transmission but offer limited protection against genuine hydrostatic pressure. They're a reasonable option for dampness caused by condensation or minor surface seepage, not sustained water intrusion. If you've recently done drywall repairs due to moisture, our drywall repair guide covers how to match repair approach to damage type.
98%
Basements experiencing moisture over their lifetime
The American Society of Home Inspectors has cited that a large majority of US basements will experience some form of water intrusion or moisture problem.
$5,000-$15,000+
Typical cost range for exterior waterproofing
Costs vary widely by foundation perimeter, depth, soil type, and regional labor rates; always obtain itemized estimates from licensed contractors.
Permits, Professionals, and Knowing Your Limits
Interior drain tile installation and exterior excavation almost always require permits in US jurisdictions. Even some sump pump installations trigger local review requirements. Check with your municipality before beginning any significant work, and verify that contractors are licensed and carry appropriate insurance.
If you're planning to finish your basement after waterproofing, sequencing matters enormously. Addressing moisture before installing framing, insulation, or drywall can save thousands in future remediation costs. Our basement finishing planning guide walks through what to investigate before any finish work begins.
Getting at least two professional assessments - not just quotes - helps clarify what you're actually dealing with. Reputable contractors will describe the source of the problem, not just the system they sell.

Author
Articles Haven Editorial Contributor
Articles Haven Editorial Team is the collective byline for our editorial team and contributor network. Articles published under this byline or an editorial pen name are researched, written, and reviewed according to our editorial standards for clarity, consistency, and independence before publication.
View all articles →